Jump to content


Photo
- - - - -

Wills Mini Special


  • Please log in to reply
320 replies to this topic

#16 minimissions

minimissions

    Up Into Fourth

  • Members
  • PipPipPipPipPipPipPipPipPip
  • 3,427 posts
  • Location: North West
  • Local Club: M.M.O.C

Posted 23 September 2013 - 12:38 PM

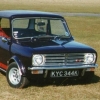
Lovely Mini Special project i had one of these, but the (Leaf Silver one) which was meant to be my first car, and had to sell it when i needed funds which was gutting :( was just ready for the paint all the hard work had been done, the new owner has since finsihed it and its stunning.


 I will ne keeping an eye out on this build :)


good work so far...


Edited by minimissions, 23 September 2013 - 12:39 PM.


#17 sonikk4

sonikk4

    Twisted Paint Polisher!!!

  • Admin
  • PipPipPipPipPipPipPipPipPipPipPip
  • 15,903 posts
  • Name: Neil
  • Location: Oxfordshire

Posted 23 September 2013 - 06:58 PM

A bit more repair work today on the inner wings.


L/h inner wing at the front looked very iffy and covered in gunk along with the r/h inner wing.

L/h inner

IMG_2018_zps0926789e.jpg


R/h inner

IMG_2017_zps6d46ca80.jpg


Once the crap was off on the l/h inner i found this, some previous rust removal that had thinned the metal drastically

IMG_2020_zpse99de0f0.jpg

New metal in place

IMG_2021_zps4931f1c8.jpg


New metal welded in

IMG_2022_zpsd2ac043c.jpg


Desperately needing panels now as there is not much more i can do apart from the old little repair on the roof guttering.


#18 okc78

okc78

    Mini Mad

  • Noobies
  • PipPipPipPip
  • 169 posts
  • Location: Gloucestershire
  • Local Club: none so far

Posted 23 September 2013 - 08:25 PM

Hi sonikk4

I've not spoken to you before but thought I should take the time to thank you for posting and contributing.

Before I started my mkII project  I was lurking on the website and have been watching your work for a while, project erm and paddy. I've taken quite a few tips from you and its all helped inspired me to get the welder out and start dealing with the rot.

I look forward to seeing this one progress.

Cheers, Ollie


#19 sonikk4

sonikk4

    Twisted Paint Polisher!!!

  • Admin
  • PipPipPipPipPipPipPipPipPipPipPip
  • 15,903 posts
  • Name: Neil
  • Location: Oxfordshire

Posted 23 September 2013 - 08:39 PM

Hi sonikk4

I've not spoken to you before but thought I should take the time to thank you for posting and contributing.

Before I started my mkII project  I was lurking on the website and have been watching your work for a while, project erm and paddy. I've taken quite a few tips from you and its all helped inspired me to get the welder out and start dealing with the rot.

I look forward to seeing this one progress.

Cheers, Ollie


Glad the threads help out Ollie.


#20 sonikk4

sonikk4

    Twisted Paint Polisher!!!

  • Admin
  • PipPipPipPipPipPipPipPipPipPipPip
  • 15,903 posts
  • Name: Neil
  • Location: Oxfordshire

Posted 24 September 2013 - 06:55 PM

Had a look at the roof today and all is not well.


The guttering on the r/h side was somewhat crispy

IMG_2023_zps37120f3b.jpg

IMG_2024_zps1673f3c9.jpg


so a bit of cutting and metal fabbing i ended up with this

IMG_2025_zps2b8a92fa.jpg

IMG_2032_zps70fff0ec.jpg

IMG_2034_zps393cc91f.jpg


There was rust in other places as well some not so obvious until the paint came off

IMG_2028_zps3fafc264.jpg

paint off

IMG_2029_zps8c6a4f96.jpg


so instead of chopping out a large section i individually ground back each area of rust with a die grinder

IMG_2030_zps54200d56.jpg


with all of the rust ground out i then filled with new metal

IMG_2031_zps78b19ca4.jpg


The same process was applied here as well

IMG_2026_zps0b677d29.jpg


This took a lot longer to do and was a real pain in the backside. Carbide burrs of different shapes and roloc discs plus the use of a flat wire wheel got the surface rust out.

IMG_2027_zpsd36259a1.jpg


This in turn got polished back with a DA sander then treated so no more rust there. I really did not want to have to cut that lot out. (not shown in this picture)


#21 alex-95

alex-95

    I am THE CLAMP MAKER

  • TMF+ Member
  • PipPipPipPipPipPipPipPipPipPip
  • 6,017 posts
  • Location: l

Posted 24 September 2013 - 07:03 PM

Good work neil. Is the anti-warping  stuff reusable?


#22 sonikk4

sonikk4

    Twisted Paint Polisher!!!

  • Admin
  • PipPipPipPipPipPipPipPipPipPipPip
  • 15,903 posts
  • Name: Neil
  • Location: Oxfordshire

Posted 24 September 2013 - 07:06 PM

Good work neil. Is the anti-warping  stuff reusable?


Yes it is apparently. If it dries out you can add more water to it. I did find you need to use more than what i did there as there was some heat transfer. Still trial and error at the mo so i also had a wet cloth to hand as well. 


#23 okc78

okc78

    Mini Mad

  • Noobies
  • PipPipPipPip
  • 169 posts
  • Location: Gloucestershire
  • Local Club: none so far

Posted 03 October 2013 - 07:42 PM

Hi, have you got a link to this anti warping clay your using? I've not seen it before.

I've been using the wet rag technique as you mentioned and some sheets of copper but I found the copper affects the penetration of the weld, I like to be able to grind it back on the inside as well. This clay your using looks more user friendly.

Thanks, Ollie


#24 sonikk4

sonikk4

    Twisted Paint Polisher!!!

  • Admin
  • PipPipPipPipPipPipPipPipPipPipPip
  • 15,903 posts
  • Name: Neil
  • Location: Oxfordshire

Posted 03 October 2013 - 07:55 PM

This is the link to their page


http://www.frost.co....ront-414ml.html


#25 silve1999

silve1999

    One Carb Or Two?

  • Traders
  • PipPipPipPipPipPipPip
  • 1,146 posts
  • Location: Sussex
  • Local Club: MiniFreakz, Brighton Mini Club

Posted 04 October 2013 - 06:41 PM

very nice, inspiring to see some of these techniques


#26 sonikk4

sonikk4

    Twisted Paint Polisher!!!

  • Admin
  • PipPipPipPipPipPipPipPipPipPipPip
  • 15,903 posts
  • Name: Neil
  • Location: Oxfordshire

Posted 11 November 2013 - 09:32 PM

Finally received all of the panels for the mini today. Disappointingly the doorstep panels from M machine are not their own but from Magnum so about as much use as a chocolate tea pot.

IMG_2153_zpse7dc253c.jpg


#27 Russw

Russw

    Mini Mad

  • Noobies
  • PipPipPipPip
  • 107 posts
  • Location: Leicester

Posted 12 November 2013 - 08:45 AM

Looking good Neil. I've just bought heritage door steps as you mentioned the m machine ones might be magnum, I didnt think they were that expensive either. Maybe a swoops in order?

#28 sonikk4

sonikk4

    Twisted Paint Polisher!!!

  • Admin
  • PipPipPipPipPipPipPipPipPipPipPip
  • 15,903 posts
  • Name: Neil
  • Location: Oxfordshire

Posted 12 November 2013 - 10:55 AM

Looking good Neil. I've just bought heritage door steps as you mentioned the m machine ones might be magnum, I didnt think they were that expensive either. Maybe a swoops in order?


Yep I need to talk to Will as these will be a waste of time. Not sure what's going on with M Machine as they say the new steps are their own pressing.

#29 leadly

leadly

    One Carb Or Two?

  • Members
  • PipPipPipPipPipPipPip
  • 779 posts
  • Location: Derby
  • Local Club: [] D.C.M.O.C []

Posted 14 November 2013 - 03:28 PM

Ah, didn't realise cold front was reusable! Cracking work as always!

#30 sonikk4

sonikk4

    Twisted Paint Polisher!!!

  • Admin
  • PipPipPipPipPipPipPipPipPipPipPip
  • 15,903 posts
  • Name: Neil
  • Location: Oxfordshire

Posted 18 November 2013 - 07:13 PM

Nothing much done to the car but i did get this

6ac5d773-7612-47e5-bf6e-367d0c469c3e_zps


and made this, 

3abfbba8-957a-439c-809c-65749dcb7933_zps


so any clues as to what it is


0 user(s) are reading this topic

0 members, 0 guests, 0 anonymous users